

























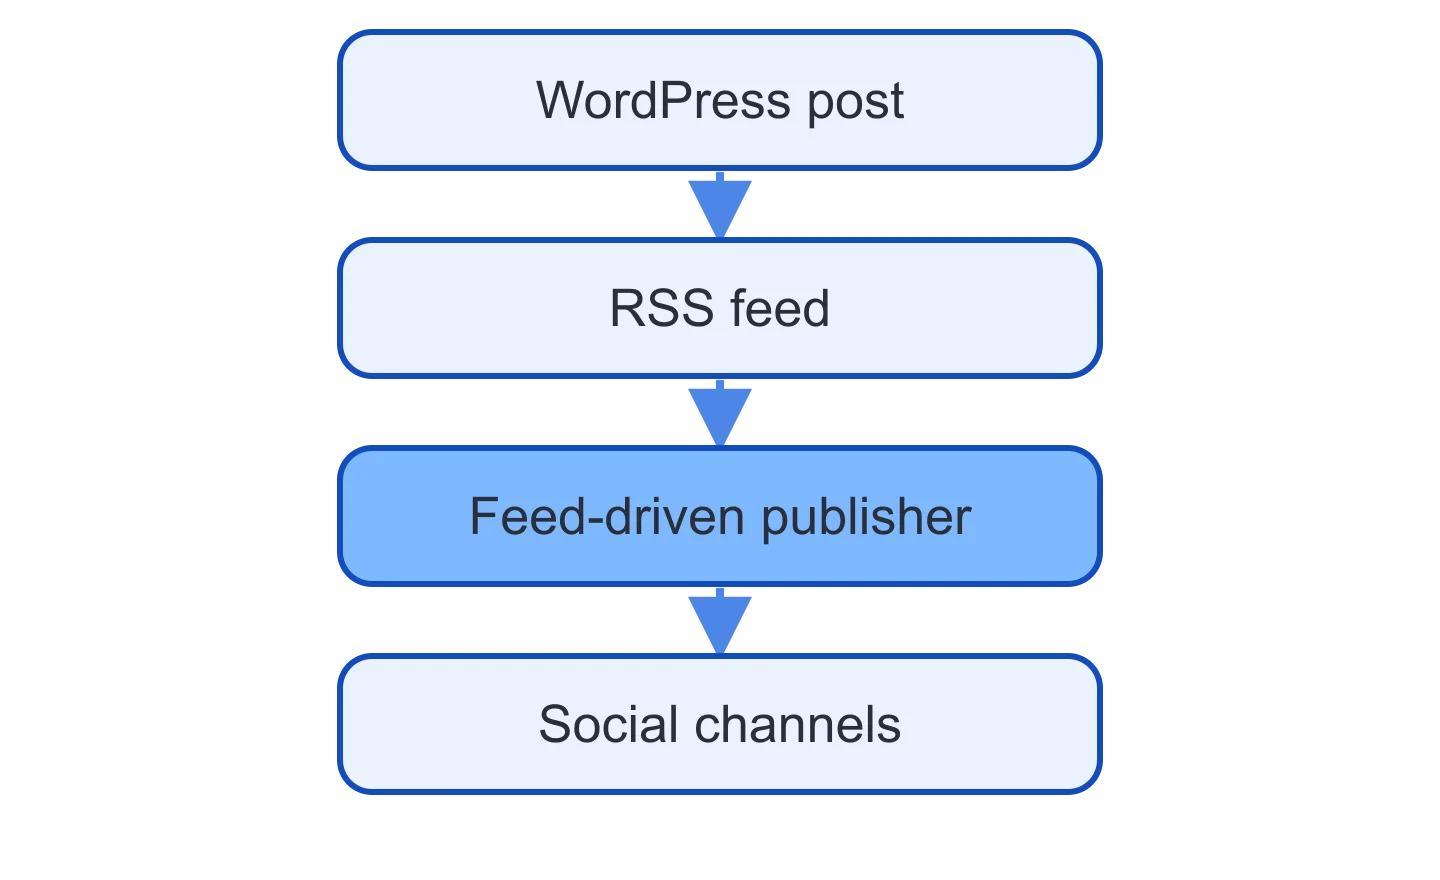
You can get from blog to social media without copy-pasting by letting your WordPress RSS feed do the work. Every post you publish lands in the feed, a feed-driven tool picks it up, and it sends a post to each channel using a layout you set once. Add UTM tags to the link, make sure each item has an image, and adjust the length and fields per network.
Below are seven steps for that setup. After them come fixes for the problems people hit most often: posts that never show up, missing images, messy analytics and X posts that run long.
How does WordPress auto posting from a feed work?
WordPress publishes built-in feeds for your site in RSS 2.0 and Atom, plus a feed for comments. When you hit Publish, the new post appears at the top of the main feed. A feed-driven publisher checks that feed on a schedule, finds the new item and turns it into a social post for each channel you connected.
So the feed becomes your single source. You skip the sharing plugin per network and the five rounds of pasting the same link. For the same model with any feed, not only WordPress, see our guide to RSS to social media auto posting.
One catch. The feed lists only what WordPress has published. Drafts and scheduled posts don't appear until they go live, which is usually what you want.
How do you connect your WordPress feed?
1. Find your feed and check what's in it
With pretty permalinks turned on, the main feed is usually at yourdomain.com/feed/ and the Atom version at yourdomain.com/feed/atom/. Open it in a browser. You should see your latest posts as XML. If you can't find it, here's how to find an RSS feed URL on any site.
Then open Settings > Reading in WordPress. Two settings there shape what your social posts can use: how many recent posts the feed shows, and whether each item carries the full text or a summary. A summary is enough for most social posts. Full text gives an AI rewrite step more to work with.
💡 Search the feed for your latest post's featured image URL. If it isn't there, your posts may go out without a picture. The troubleshooting section below covers the fix.
2. Connect the feed and filter what goes out
Add the feed URL as a source in your publishing tool. Before you turn anything on, decide two things.
First, which posts qualify. Not every post fits every channel. Include and exclude keyword filters handle this. For example, you might keep posts with "hiring" in the title off your Instagram account but send them to LinkedIn.
Second, which items the tool picks up. Your feed already holds your recent posts the moment you connect it. If your tool has a setting for publishing only items found after its previous run, use it, so last month's backlog doesn't bury today's post.
How should each post look?
3. Choose what each post contains
This is the layout: which parts of the WordPress post appear, and in what order. The usual parts are the title, a short excerpt, the link, the featured image and a few hashtags.
A reasonable starting point for each network:
- LinkedIn: title, short excerpt, link, image
- X: title and link, at most one hashtag
- Facebook: title, excerpt, link
- Instagram: image, then title and excerpt
- Telegram: title, excerpt, link
Treat these as a first draft. After a week of real posts, look at what reads well on each channel and adjust.
Keep hashtags stable. Two or three that describe what your blog covers, set once per channel, are easier to manage than a fresh pile on every post.
4. Tag every link with UTM parameters
UTM tags tell your analytics where a visit came from. Google's URL builder help defines utm_source as the referrer, utm_medium as the marketing medium and utm_campaign as the campaign name. Google recommends always including all three. They follow a ? in the URL as name=value pairs joined by &:
?utm_source=linkedin
&utm_medium=social
&utm_campaign=new-posts
In the real link that's one line, added after your post URL.
Use one source per platform and one medium per channel type, as Google suggests. Values are case sensitive, so utm_source=LinkedIn and utm_source=linkedin show up as two different sources. Pick lowercase and write your values down. A parameter you leave out shows as (not set) in reports.
⚠️ Some tools attach tags per automation, not per post. In that case, set up one automation per network so each one gets its own utm_source.
How do you handle images and each network?
5. Make sure every post has an image
Set a featured image on every WordPress post, then confirm it shows up in the feed item. A post with no image gives your tool nothing to attach.
Instagram is the strict one. Meta's content publishing docs for the Instagram API say JPEG is the only supported image format, and the image must sit at a publicly accessible URL when the post is attempted. The image that reaches Meta has to meet that, not necessarily the original in your media library. Some publishing tools convert and re-host images for you, so check whether yours does.
6. Adjust the post for each network
Under X's counting rules, a post holds up to 280 characters, every URL counts as 23 characters whatever its real length, and each emoji counts as 2. A link leaves 257 characters for everything else, spaces included. A long title plus three hashtags can still go over, so drop hashtags on X first.
LinkedIn and Facebook give you room for an excerpt. Instagram wants the image to carry the post, with a caption under it.
If you want the wording itself to change per network, that's a separate step. You can add an AI summary or rewrite per destination, or edit by hand the posts that matter most. Either way, decide who checks the output before it goes live. Our human review workflow for AI social posts has a checklist you can copy.
How do you schedule and test it?
7. Set the schedule and preview before it goes live
Decide how often the tool checks your feed and posts. Every few hours suits a blog that publishes daily. Once a day is plenty for a weekly one. If your tool lets you pick days and times, choose slots when your audience is online, and set the right timezone.
Preview one post per channel before you switch it on. Read the final text, check that the link carries your UTM tags and confirm the image is right. If an AI rewrite is on, remember the live text can differ from the preview. Then publish a real post and watch it go out.
What should you do when WordPress auto posting goes wrong?
The feed URL returns a 404
Go to Settings > Permalinks and click Save Changes without changing anything. That usually refreshes WordPress's rewrite rules and brings the feed back. If it still fails, check whether a security or caching plugin is blocking feeds.
A new post never showed up
Check that it's published, not scheduled. A scheduled post enters the feed only at its publish time. Next, check your keyword filters, since one exclude word in the title is enough to skip it. Last, check the schedule. If the next run is three hours away, the post is still waiting.
Posts go out without an image
WordPress doesn't always put the featured image in the RSS item. Your theme or a plugin may leave it out. Either add a plugin that includes featured images in RSS feeds, or have a developer add the image to the feed with a hook in your theme. Then open the feed again and confirm the image URL appears in the newest item. For Instagram, also check that the image your tool sends is a JPEG at a public URL.
Analytics shows (not set) or split sources
A missing parameter shows as (not set). Split sources can come from a case mismatch, like Facebook in one automation and facebook in another. Put your UTM values in one shared note and copy from it.
X posts run too long
Count the link as 23 characters and each emoji as 2. Then shorten what goes into the X layout: title and link only, no excerpt, no hashtags.
Old posts flooded your channels
This can happen on the first run, when the tool finds every post already in the feed. Use a setting that publishes only items found after the previous run, if your tool has one. Next time, run the first pass on a test account. Deleting a dozen live posts takes longer.
Questions about WordPress auto posting
Do you need a plugin to auto post from WordPress?
No. Plugins work, but a feed-based tool needs only the RSS feed WordPress already publishes. That also helps on sites where you can't install plugins, such as a client's blog.
Should every network get the same post?
Same article and link, different layout. X needs a short version, LinkedIn can take an excerpt, and Instagram needs an image. Set those layouts once per channel and every new post follows them.
Will sharing the same post everywhere hurt SEO?
A social post that links to your article points readers back to it. Duplicate content questions come up when you republish the full text on another site, which is a different setup from this one.
How fast does a new post reach social channels?
It depends on how often your tool checks the feed and on your schedule. With a check every few hours, the post goes out within that window.
Can you review posts before they go out?
A fully automatic setup posts without asking. If some posts need a second look, preview the layout at setup and share those posts by hand instead.
Doing this inside Feedigy
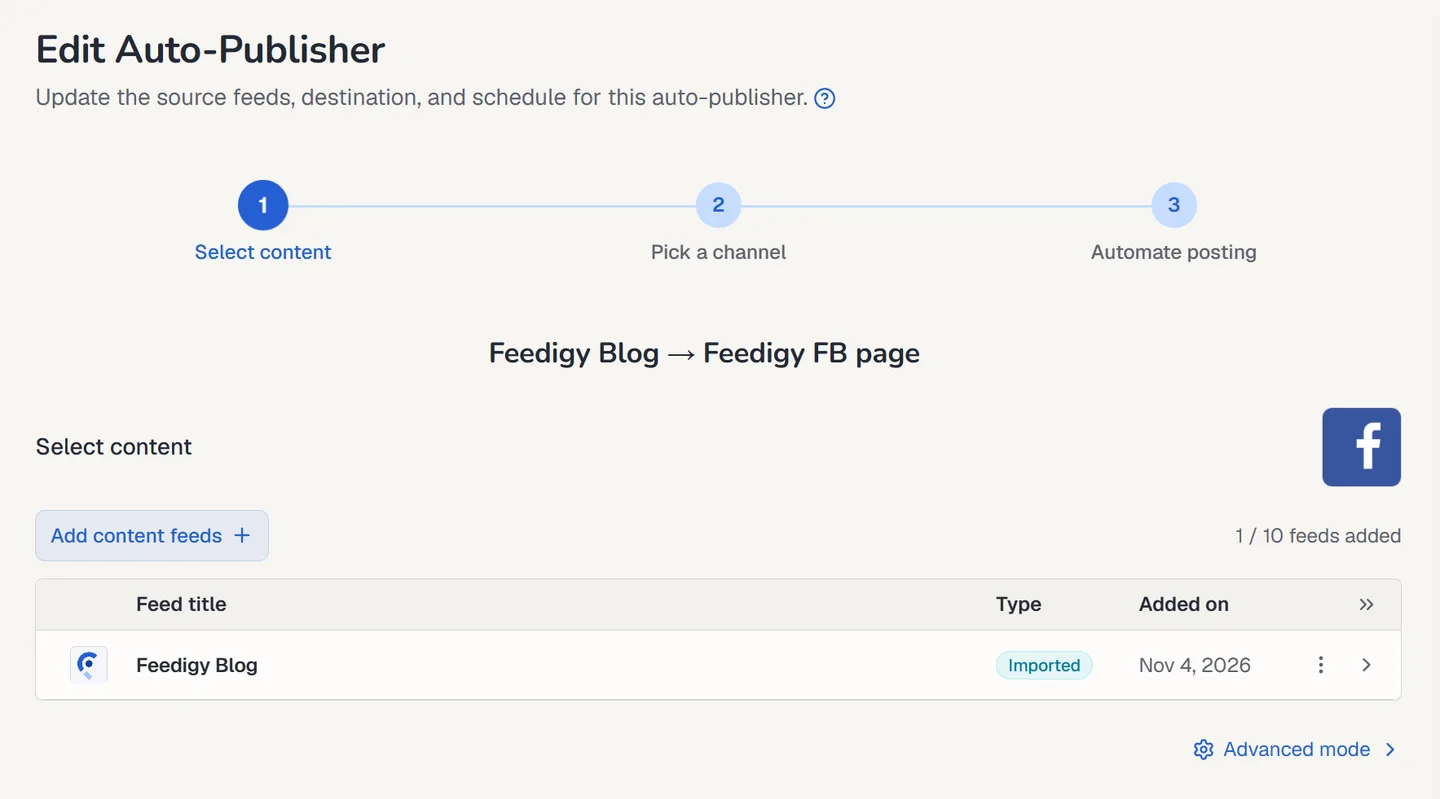
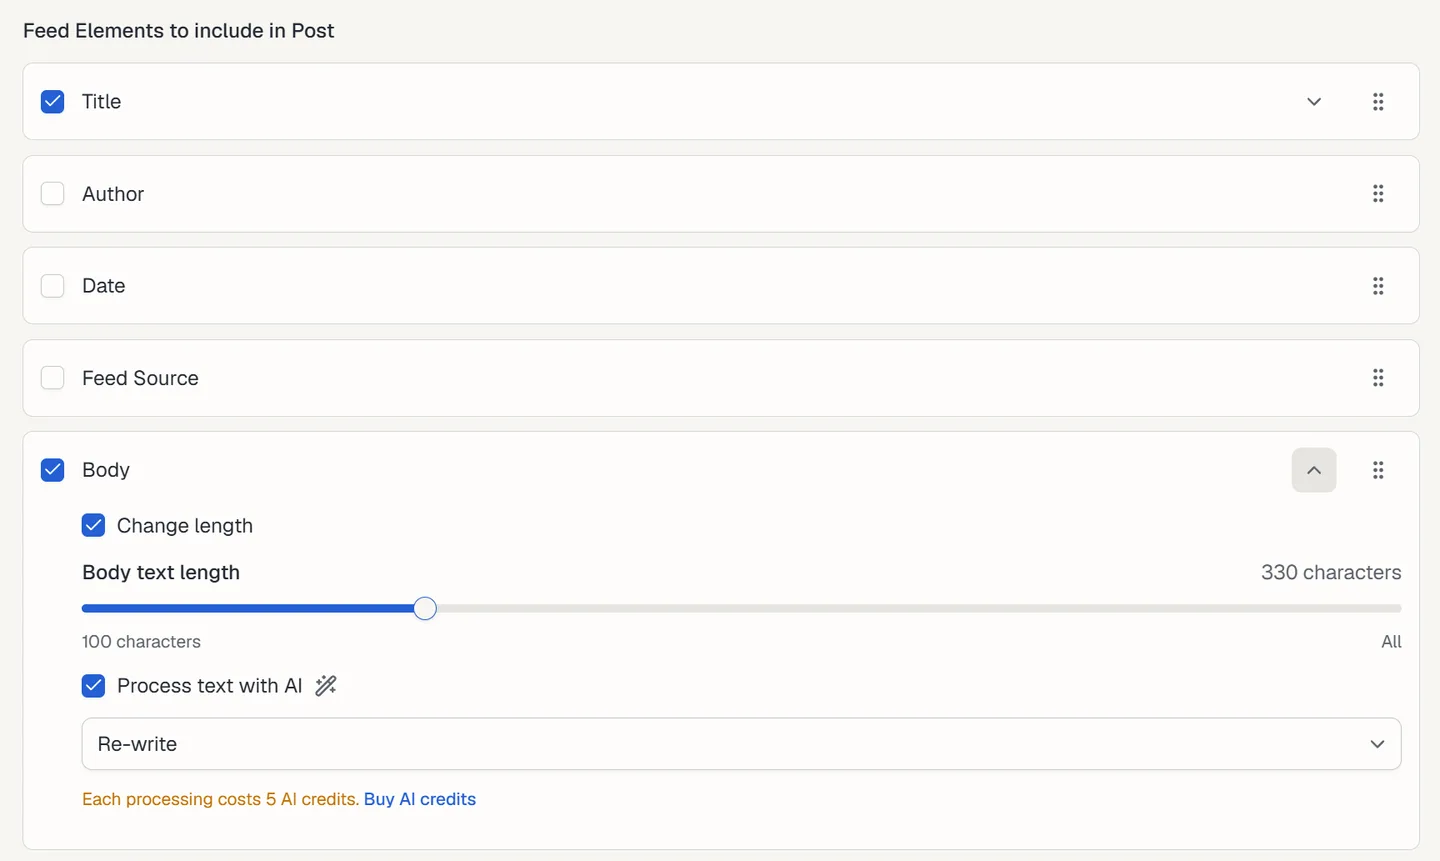
In Feedigy, you add your WordPress site through Import feeds: paste its RSS URL, then select that imported feed in an Auto-Publisher. The Auto-Publisher wizard has three steps. First, pick up to 10 feeds and set include or exclude keywords. Second, pick the channel and the "Content to include" fields. Title, Author, Date, Feed Source, Body, Link and Tags can be switched on and reordered, and images are a separate attachment control. Posting order sits in the advanced settings and offers Newest first, Oldest first, Random and Only new items, which is the one to pick for a first run. Add persistent hashtags there too.
For Facebook, LinkedIn, X and Telegram, "Append to post links" takes your UTM tags, for example utm_source=linkedin plus utm_medium=social and utm_campaign=new-posts, and Feedigy adds the ? or &. Use one Auto-Publisher per channel to give each its own utm_source. Instagram needs an image, and Feedigy uses the item's image first, then the feed's image. Third, set an interval or custom days and times, with a timezone.
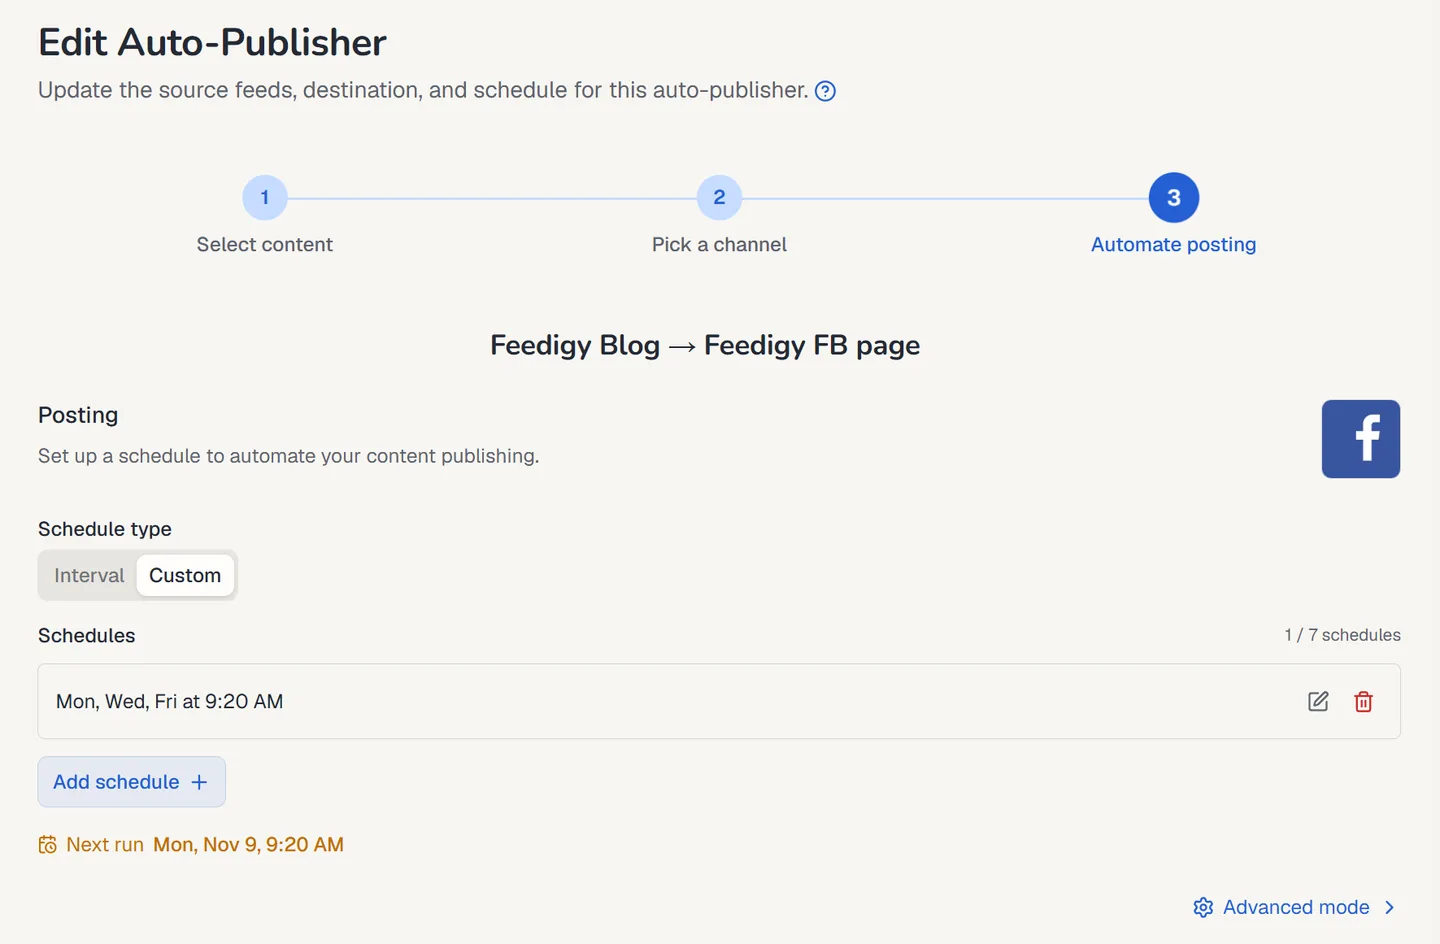
The wizard previews each channel's post layout, including the X character count. Body Summarize or Re-write costs 5 AI credits per processing, and optional title processing costs 1. That AI output is produced when the post publishes, so it can differ from the preview. Scheduled and published posts appear in the Calendar.